[ home ]
Download a PDF file with a set of flashcards for GCSE transformations including some questions.
GCSE Maths at Foundation level has questions on transformations of shapes including translation, reflection, rotation and enlargement. This topic is revision for the younger students in my part time day and evening GCSE classes, but can be new for the mature students and students who went to school in different countries. The vocabulary needs to be emphasised as it might be new and unfamiliar to some students. A laptop and projector can be very useful as most drawing programs have rotation, resizing and 'flip' tools in them that can be used to demonstrate transformations.
I'm trying an A6 slide size as a format that can be used on phones and tablets as well as on the projector. The format seems to work well for these diverse uses, using A6 slide size, printed four to a page, with 24pt and 18pt text.
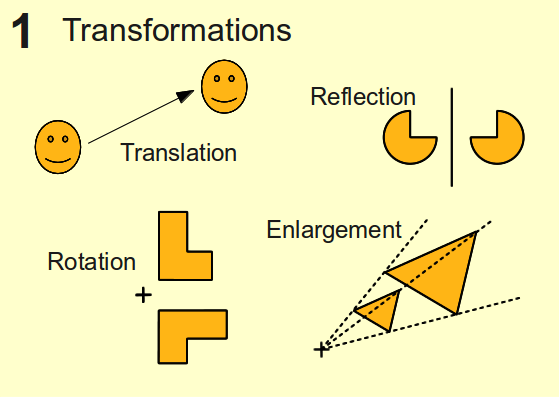
The slides followed a workmanlike sequence, with the four transformations summarised on the first slide providing an 'advanced organiser' for the lesson.
I described each of the transformations with this slide on the projector, emphasising that the reflection line is a 'birds eye view' of the person, a mirror and the reflection. I was able to demonstrate enlargement using the projector image, holding my hand half way between the projector and the screen did result in a shadow that was about twice as large as my hand.
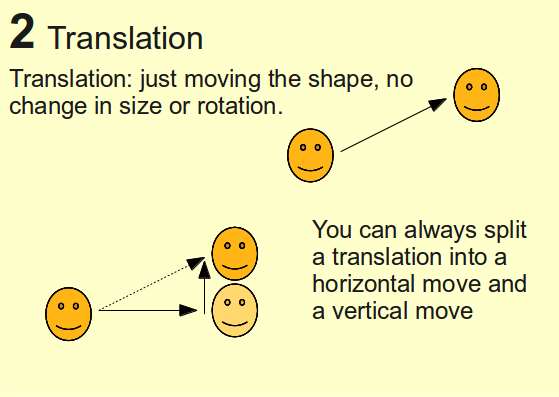
After the introduction slide, I just went through each of the transformations with an overview slide and a question slide. For example, below are the slides for translation.
The first translation slide (slide number 2 in the presentation) just explains what a translation is, and how any translation can be split into a horizontal and vertical component. I ask what kind of triangle you end up with when you do split a translation into components.
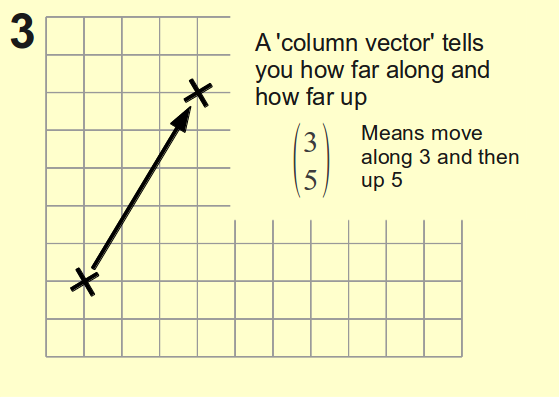
The second translation slide (slide number 3) reduces the shape to a single point on a centimetre grid. We draw the right angled triangle out, and I show how the column notation is different to the coordinate notation and how the lack of an origin on the grid shows the relative nature of the translation. Higher level students are challenged: which bit of maths can tell you how long the translation arrow is?
The third translation slide (slide number 4) is just a quick check of learning: students invited to write down the answers to the two questions while I check around to see if people have got the hang of it. I do have a couple of students in one class who are incapable of not shouting out if they know, so we just go with that.
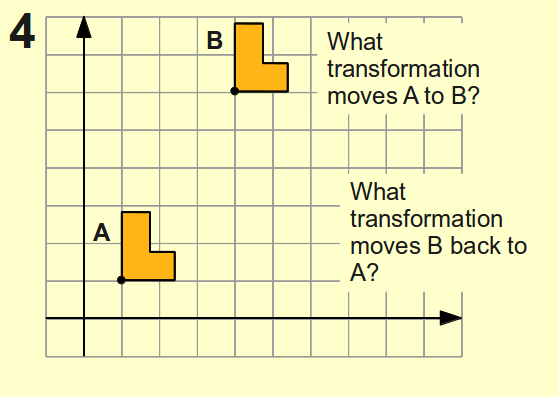
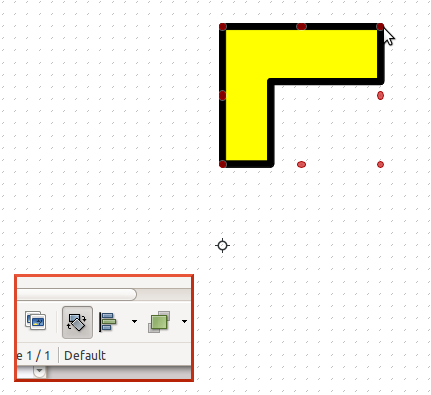
I've added a dot to the corner of the L shape above and to its translated image. That dot helps students to focus on the same part of the two shapes as they trace out the translation. I've found that students can sometimes write down a column vector with too large a horizontal or vertical component because they are looking at different positions on the shape and the transformed version of the shape.
The same pattern is followed for the three other transformations. There are some question slides, then we use a worksheet from the textbook teachers pack for reinforcement, along with MyMaths activities. Even the mature students who had not met this topic before and for whom the terminology was new were happy that they could answer the harder questions. This was a relatively smooth one hour or so with two groups.
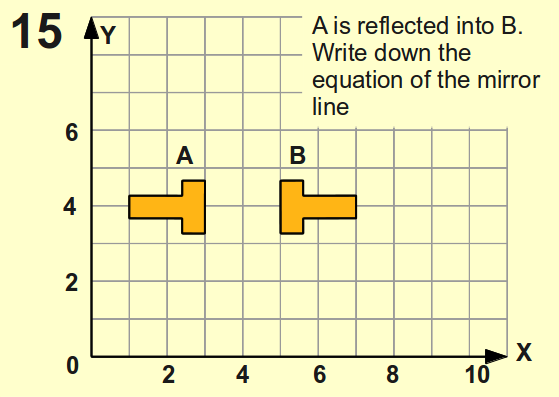
One of the question slides was designed to link back to work on graphs and the formulas used to describe the 'special' lines on graphs, see the slide below. After some prompting, the students were able to name the mirror line as X=4. That lead to a quick review of other possible mirror line formulas (e.g. Y=3, X=Y and so on) on the interactive whiteboard.
A question that arose from the worksheets we used was with an enlargement from a centre where the enlarged shape overlapped the original shape. Students didn't think that was right until we worked through the enlargement factors. I might add an overlapping enlargement to the slides.
A higher level extension would include combined transformations, and I also challenge students who have covered trigonometry to 'resolve' a translation into its horizontal and vertical parts, probably me reverting to type with my physics.
Try an A6 page size for the presentation file, with body text at 18 point and slide headings at 24 point. This choice results in a slide that is readable on a phone, useable on the whiteboard if a little large, and prints well four to an A4 sheet. Individual slides enlarged to A3 make usable posters as well. I use LibreOffice Impress with a grid set to 0.2cm for the drawings, I always use the blank slide layout.
In LibreOffice Impress, I just
On each slide, I used textboxes, I don't like bullet point layouts.
Using the drawing tools in LibreOffice Impress you can rotate a shape, and you can control the position of the centre of rotation. We discovered in class that MS PowerPoint 2010 does not allow you to change the rotation centre, at least none of us could find a way to do it.
When demonstrating rotation, I made a copy of the shape and placed the copy on top of the shape, so that the copy rotated and the original stayed in place. I also put a small cross on the position of the centre of enlargement.
LibreOffice is available as a portable application that you can run from a USB stick rather than having to install it in Windows.
Keith Burnett, Last update: Fri Apr 06 2012