[ Root ]
This page contains formulas and procedures that will tell you how to plot a star chart in stereographic projection. The maps presented here plot the stars of the Yale Bright Star Catalogue 5th edition down to 6.5 magnitude - the naked eye stars. My project is to provide a basic sky chart covering the Northern sky in 7 maps: one polar down to +60 degree declination; and 6 equally spaced gores of RA extending from +60 to -30 declination. I doubt I will take any business from the legendary Norton's Star Chart or from The Cambridge Star Atlas, now in its third edition - my aim is rather to provide a displosable, photocopyable, customisable and copyright free teaching aid, and to explore the methods used in star chart production.
The star charts are drawn to J2000.0 and the programs used to generate the charts are essentially run once. To solve the problem of clipping of arcs and constellation lines at the boundary of each chart, I used the freeware IntelliCAD program. CAD programs have a 'trim' command built in as a standard feature and they allow macro scripts to be run to automate drawing large numbers of the same objects. I used simple QBASIC programs to generate the macro scripts for IntelliCAD to plot the stars, boundaries and constellation figures. I drew the stereographic grid directly using IntelliCAD commands.
[ Top ]
When you draw a star chart, you are making a flat representation of the Celestial Sphere, itself a fictional abstraction (for the stars are in truth drifiting throughout the Universe, its only our huge distance from the nearest stars that gives us the illusion of being inside a dome under the night sky). There are various ways of mapping the surface of a sphere onto a flat plane. Steven Dutch has reviewed the most common spherical projections (i.e. projections of a sphere onto a plane) from a terrestrial mapping perspective on his excellent and useful Web page, and he has also provided a page on constructing the stereographic projection.
The stereographic projection has a long history in geography and astronomy - the stereographic polar projection used in the astrolabe and the equatorial projection has been used for star maps for some time. Part of the popularity of this projection must be due to its two basic properties
The main drawback is shape distortion for large shapes - areas change in different ways at different distances from the point of projection. The circle is one of the easiest shapes to draw accurately - other projections require complex curves to be calculated and plotted. This must have been a factor in the early use of the projection.
The star map requires three main problems to be solved
[ Top ]
For each gore of RA, we pick a different centre of projection on the equator. For (say) the 4h hour gore, the 'centre of projection' is 4 hours or +60 degrees of longitude and the latitude of the projection centre is zero. Each RA gore in my chart covers a range of longitude of -37.5 to +37.5 degrees and from +60N to -30S. This reflects my position on the Northern hemisphere (on a small island under the jetstream and bathed in the warm waters of the North Atlantic Current!)
Let W be the 'longitude' of the star from the chosen point of projection, and L be the declination (latitude). The coordinates of the star on the projection plane are given as follows
Equatorial Stereographic Projection

x' = cos(L)* sin(W)
y' = sin(L)
z' = cos(L) *cos(W)

These are the cartesian coordinates of the star if
the North Pole has coordinates (0,1,0) and the projection
point has coordinates (0,0,1), and the South Pole has
projection points (0,-1,0). The star is at a distance of
1 from the centre.

The coordinates in the plane of the projection are given by

X = x' / (1 + z')
Y = y' / (1 + z')

Worked case - projection of Deneb with projection point 0h
0 Dec

Deneb has J2000.0 coordinates of about RA 20h 41m 26s and
DEC 45 deg 16' 49"

This gives (converting to degrees)

W = -49.6421  L = 45.2803

x' = -0.536183
y' =  0.710558
z' =  0.455649

X = -0.3683
Y =  0.4881
You might check the X, Y coordinates of the following W (longitude), L (latitude) values used for the 'frame' of the star chart.
( W, L)    -->  (X, Y)
(-40, 60)   --> (-0.232385, 0.626183)
( 40, 60)   --> ( 0.232385, 0.626183)
(-40, -30)  --> (-0.334655,-0.300587)
( 40, -30)  --> ( 0.334655,-0.300587)
[ Top ]
Projecting star coordinates as points in the projection plane is the main part of plotting the chart. You also need a frame around the chart and a grid of RA and DEC values. Circles on the sphere will project as circles on the plane, each circle will have X, Y coordinates for the centre and a radius, R. As the longitude circles or circles of constant W are symetrical about the polar meridian, then Yw = 0. Equally, as the latitude circles or circles of constant L are symetrical about the equator, then Xl = 0.
Constant W circles (RA colures)

Xw = -1 / tan(W)
Yw = 0
Rw = -1 / sin(W)

Constant L circles (Latitude small circles)

Xl = 0
Yl = 1 / sin(L)
Rl = 1/ tan(L)

Worked example

RA circles W = -37.5 (left hand frame of map)
Xw = +1.30323
Yw = 0
Rw = 1.64268

As you can see, the centre of the circle is on the
opposite side of the meridian to the latitude we
are drawing.

Dec circles L = +60
Xl = 0
Yl = 1.15470
Rw = 0.57735

As you see, the latitude circles have smaller radii closer to
the poles, and have centres on the same side of the equator
as the latitude we are drawing.

A summary table for a series of values of W and L can be
calculated easily using a spreadsheet

Meridian great circles         Latitude small circles

 w    centre (x)  radius       l   centre (y)  radius
-90     0.00000	 -1.00000      90   1.00000    0.00000
-75     0.26795	 -1.03528      75   1.03528    0.26795
-45     1.00000	 -1.41421      60   1.15470    0.57735
-37.5   1.30323	 -1.64268      45   1.41421    1.00000
-30     1.73205	 -2.00000      30   2.00000    1.73205
-15     3.73205	 -3.86370      15   3.86370    3.73205
  0	0.00000	 INF            0   0.00000    INF
 15    -3.73205  3.86370      -15  -3.86370   -3.73205
 30    -1.73205  2.00000      -30  -2.00000   -1.73205
 37.5  -1.30323  1.64268      -45   1.41421   -1.00000
 45    -1.00000  1.41421      -60  -1.15470   -0.57735
 75    -0.26795  1.03528      -75  -1.03528   -0.26795
 90     0.00000	 1.00000      -90  -1.00000    0.00000
You can plot these circles directly in IntelliCAD using the circle command, and then use the trim command to cut off the arcs that are not required. This is how I chose to make the frames and grids for my star chart.
The polar projection (needed for the polar chart) is much easier, the circles of constant declination are simply concentric circles of non-uniform spacing, and the RA colures are a series of diameters drawin from the pole at the centre of the map. Formulas will follow when I have decided on the form of the polar map (either two semicircles of RA or a complete circle).
[ Top ]
As for my planisphere and horizon maps project, I scavenged the data files for the constellation figures and boundaries from John Walker's excellent Home Planet program. As Mr Walker is the original author of AutoCAD, there is a very minor irony in my use of IntelliCAD for most of this project.
The constellation boundaries and stick figures consist of line segments. The lines are defined by the coordinates of the ends - lines on the celestial sphere should project as arcs of circles on the projection plane. I have compromised by projecting the points at the ends of the lines onto the plane in the same way for the stars, and then drawing straight lines between them. Once again, clipping of the constellation boundaries and lines at the edge of each map was accomplished using the trim command in IntelliCAD.
[ Top ]
IntelliCAD 2000 is a fully featured Win95/98/2000 CAD program that supports a command set similar to AutoCAD, and can create and edit AutoCAD release 14 compatible DWG files. The program source code is available from the IntelliCAD Foundation, and some companies who have bought distribution licences compile and release a free version of the product. I currently use the version available from CMS. All versions of IntelliCAD support a very simple macro script file type with file extension .SCR. Some free versions, including the CMS offering include an AutoLISP compatible LISP interpreter. If you have never used a CAD program before, you might find the CAD tutorials from the University of South Wales useful (I certainly did) and Ron Leigh's Auto Lisp tutorials look as if they should provide some basic information.
I used IntelliCAD to produce the star chart as CAD packages simplify the problem of 'trimming' lines at a boundary - I could produce a coordinate grid, constellation boundaries and constellation figures without having to think too hard about clipping algorithms and calculating intersections. The general approach was to write a QBASIC program to print an SCR file containing the commands to (say) plot the stars, run the command so the output would be drawn on appropriate layer within IntelliCAD, and then apply the trims as needed. For the RA/DEC grid and frame for the map, I simply calculated the radius and centre of each circle in the projected plane using the formulas earlier in this page and drew them in IntelliCAD using the circle, array and trim commands.
By using layers for the map frame and title, the stars (plotted as 'donuts' with zero inside dimension), the RA/DEC grid, the constellation lines and the constellation boundaries, I could control the visibility of these items. You can add more and more layers for such things as labels, deep sky objects, tracks of comets and planets for a given period of time - the list is limitless.
[ Top ]
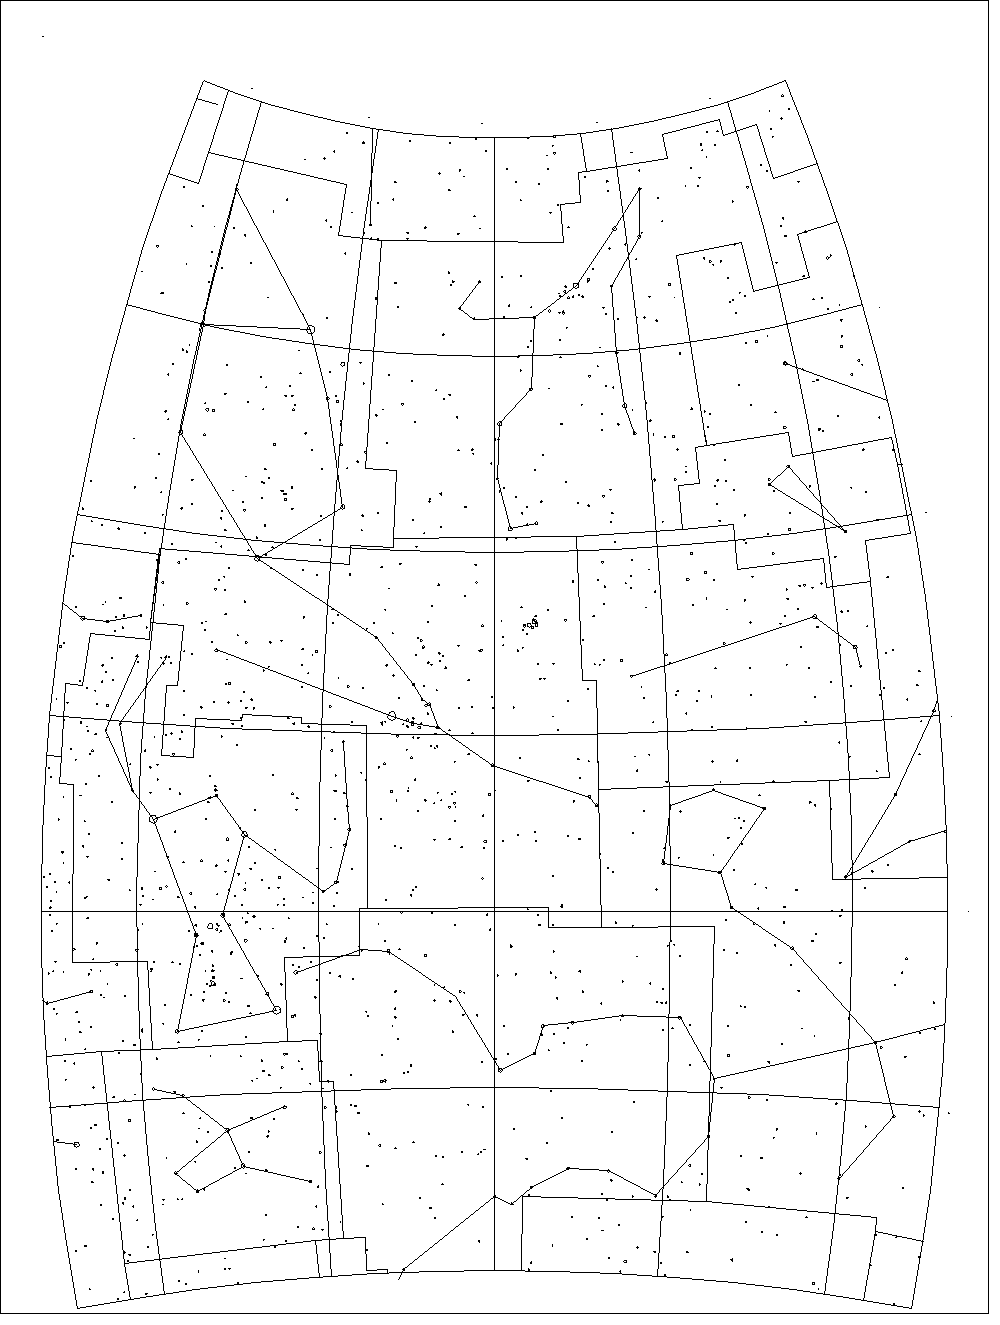
As mentioned, I am using IntelliCAD to produce a series of 7 maps, one showing the NCP down to +60 declination, and six maps showing gores of RA spaced at 6 hour intervals from +60 to -30 degrees of declination. Each opening of the resulting booklet will show you a section of sky with full information about objects on the left, and the corresponding clear pristine unlabelled star field on the right.
You can download a sample of a typical file. The gore is centred on RA 4 hours (from 6h to 2h) and shows Auriga, Perseus, Taurus and Orion. There are no star or constellation labels in the files as yet.
I have done basic eyeball checking against star maps such as the Cambridge Star Atlas and SkyMap 2000, and I have checked a few plotted positions against calculated versions. I have not done large scale checking of plotted positions or attempted to detect any errors in the catalogues.
The to do list at present includes
Don't hold your breath, but feel free to take the methods and customise the DWGs for your own use.
[ Root ]
Last Modified 14th March 2001
Keith Burnett